LCD1602 / LCD2004 I2C
YouTube Video
Introduction
Character LCDs are still one of the easiest ways to add a readable user interface to a Raspberry Pi Pico project. In this tutorial, you use both the LCD1602 and LCD2004 I2C modules with the same MicroPython library.
The nice part about the I2C backpack is that it reduces the wiring down to four connections:
VCCGNDSDASCL
That means you can focus on writing messages, menus, counters, sensor readouts, and project status screens instead of dealing with a full parallel LCD interface.
What Is the Difference Between LCD1602 and LCD2004?
LCD1602has16 columns x 2 rowsLCD2004has20 columns x 4 rows
Both displays are based on the same HD44780-style character controller family, so the programming model is very similar. The main difference is the number of rows and columns you pass into the library.
Components Needed
| Component | Quantity |
|---|---|
| Raspberry Pi Pico or Pico W | 1 |
| Micro USB cable | 1 |
| Breadboard | 1 |
| Jumper wires | Several |
| I2C LCD1602 or LCD2004 module | 1 |
Wiring
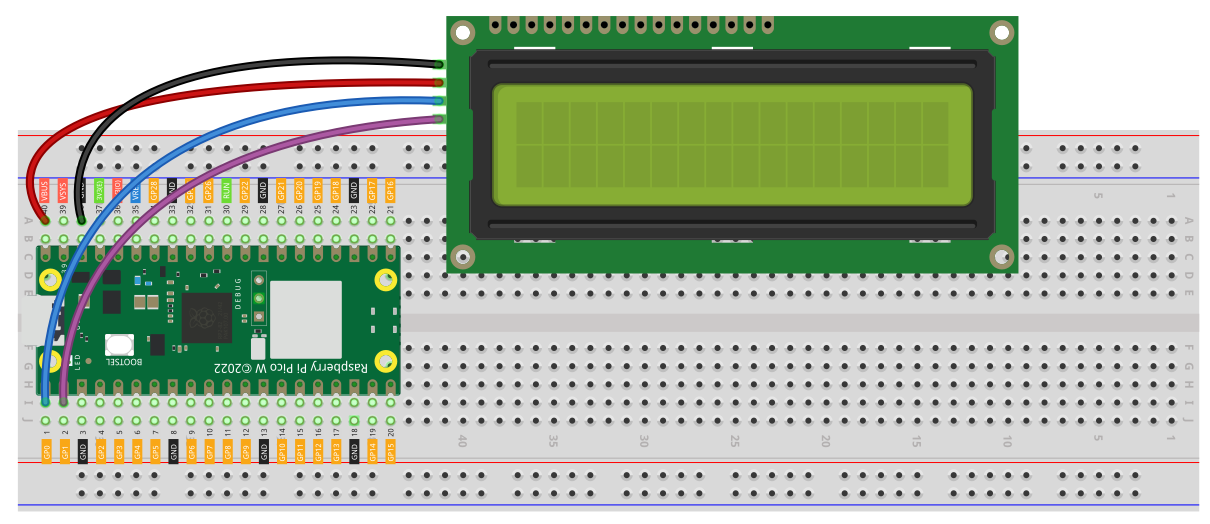
LCD1602 Wiring
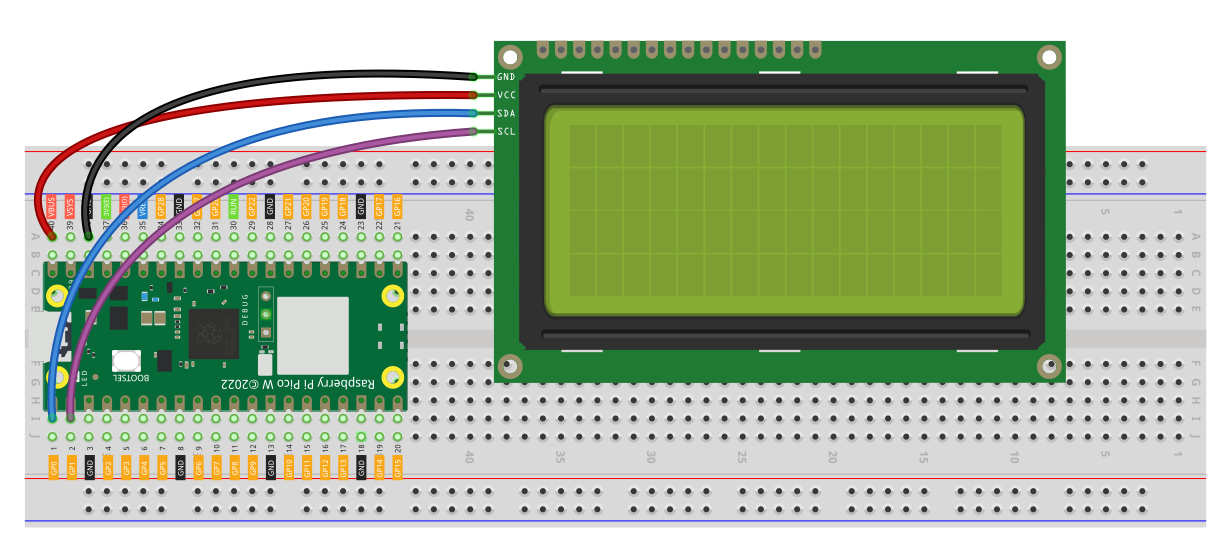
LCD2004 Wiring
Typical Raspberry Pi Pico wiring:
VCC -> 5VorVBUSon the PicoGND -> GNDSDA -> GP0SCL -> GP1
If you prefer a different I2C bus or different GPIO pins, that is fine. Just make sure the machine.I2C(...) setup in your code matches your wiring.
Check the I2C Address First
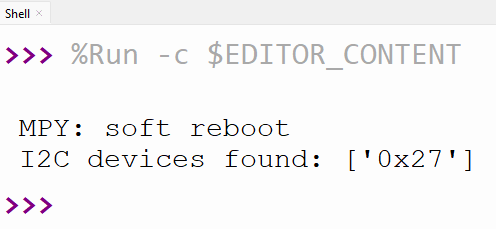
Before trying to display text, it is a good idea to scan the I2C bus and confirm the address of the module.
from machine import Pin, I2C

i2c = I2C(0, sda=Pin(0), scl=Pin(1), freq=400000)
print('I2C devices found:', [hex(device) for device in i2c.scan()])
Common I2C LCD addresses:
0x270x3F
Your library already checks for both of these by default and will fall back to the first detected device if needed.
LCD Library
Save this as nerdcave_lcd.py on your Pico:
import machine
import time


class LCD:
    def __init__(self, i2c, addr=None, cols=16, rows=2, blen=1):
        self.bus = i2c
        self.addr = self._scan_address(addr)
        self.cols = cols
        self.rows = rows
        self.blen = blen

        # Row offsets for different LCD sizes
        if rows == 1:
            self.row_offsets = [0x00]
        elif rows == 2:
            self.row_offsets = [0x00, 0x40]
        elif rows == 4:
            self.row_offsets = [0x00, 0x40, 0x14, 0x54]
        else:
            raise ValueError("Unsupported LCD size")

        self._init_lcd()

    # --------------------------
    # Initialization
    # --------------------------
    def _init_lcd(self):
        self.send_command(0x33)
        time.sleep(0.005)
        self.send_command(0x32)
        time.sleep(0.005)
        self.send_command(0x28)  # 4-bit, 2 line
        time.sleep(0.005)
        self.send_command(0x0C)  # Display ON, cursor OFF
        time.sleep(0.005)
        self.clear()

        self.openlight()

    def _scan_address(self, addr):
        devices = self.bus.scan()
        if not devices:
            raise Exception("No I2C devices found")

        if addr is not None:
            if addr in devices:
                return addr
            raise Exception(f"LCD at 0x{addr:02X} not found")

        for default in (0x27, 0x3F):
            if default in devices:
                return default

        return devices[0]

    # --------------------------
    # Low-level I2C
    # --------------------------
    def _write_word(self, data):
        if self.blen:
            data |= 0x08
        else:
            data &= 0xF7
        self.bus.writeto(self.addr, bytearray([data]))

    def _write_byte(self, data, mode):
        high = data & 0xF0
        low = (data & 0x0F) << 4

        self._write_4bits(high | mode)
        self._write_4bits(low | mode)

    def _write_4bits(self, data):
        self._write_word(data | 0x04)  # EN = 1
        time.sleep(0.0005)
        self._write_word(data & ~0x04)  # EN = 0
        time.sleep(0.0001)

    def send_command(self, cmd):
        self._write_byte(cmd, 0x00)

    def send_data(self, data):
        self._write_byte(data, 0x01)

    # --------------------------
    # High-level functions
    # --------------------------
    def clear(self):
        self.send_command(0x01)
        time.sleep(0.002)

    def home(self):
        self.send_command(0x02)
        time.sleep(0.002)

    def openlight(self):
        self._write_word(0x08)

    def backlight(self, state=True):
        self.blen = 1 if state else 0
        self._write_word(0x00)

    def set_cursor(self, col, row):
        if row >= self.rows:
            row = self.rows - 1
        if col >= self.cols:
            col = self.cols - 1

        addr = 0x80 + self.row_offsets[row] + col
        self.send_command(addr)

    def write(self, col, row, text):
        self.set_cursor(col, row)
        for char in text:
            self.send_data(ord(char))

    def message(self, text):
        row = 0
        col = 0

        for char in text:
            if char == "\n":
                row += 1
                col = 0
                if row >= self.rows:
                    break
                self.set_cursor(col, row)
            else:
                if col >= self.cols:
                    continue
                self.send_data(ord(char))
                col += 1
How This Library Works
Important ideas in your library:
colsandrowslet the same class work with both16x2and20x4displays.row_offsetshandles the internal DDRAM layout for different LCD sizes._scan_address()automatically finds the LCD on the I2C bus._write_byte()and_write_4bits()send data in 4-bit mode through the I2C backpack.message()lets you write multi-line text using\n.write(col, row, text)gives you more control over exact cursor position.
Example 1 - LCD1602 Hello World
This is the simplest starting example for a 16x2 screen.
from machine import Pin, I2C
from nerdcave_lcd import LCD

i2c = I2C(0, sda=Pin(0), scl=Pin(1), freq=400000)
lcd = LCD(i2c, cols=16, rows=2)

lcd.message("Hello World!\nfrom NerdCave")
Example 2 - LCD2004 Hello World
For a 20x4 display, the code is almost the same. The key change is cols=20, rows=4.
from machine import Pin, I2C
from nerdcave_lcd import LCD

i2c = I2C(0, sda=Pin(0), scl=Pin(1), freq=400000)
lcd = LCD(i2c, cols=20, rows=4)

lcd.message("LCD2004 Demo\nLine 2\nLine 3\nLine 4")
Example 3 - Write Text at a Specific Position
Use write(col, row, text) when you want layout control.
from machine import Pin, I2C
from nerdcave_lcd import LCD
import time

i2c = I2C(0, sda=Pin(0), scl=Pin(1), freq=400000)
lcd = LCD(i2c, cols=16, rows=2)

lcd.write(0, 0, "Top Left")
lcd.write(5, 1, "Bottom")
time.sleep(3)
lcd.clear()
Example 4 - Counter Example
This is a good first project pattern because it shows how to update just part of the screen.
from machine import Pin, I2C
from nerdcave_lcd import LCD
import time

i2c = I2C(0, sda=Pin(0), scl=Pin(1), freq=400000)
lcd = LCD(i2c, cols=16, rows=2)

lcd.write(0, 0, "Counting:")

for i in range(101):
    lcd.write(0, 1, "Value: {:3d}   ".format(i))
    time.sleep(0.1)
Example 5 - Backlight Control
Your library includes a backlight helper.
from machine import Pin, I2C
from nerdcave_lcd import LCD
import time

i2c = I2C(0, sda=Pin(0), scl=Pin(1), freq=400000)
lcd = LCD(i2c, cols=16, rows=2)

lcd.message("Backlight ON")
time.sleep(2)

lcd.backlight(False)
time.sleep(2)

lcd.backlight(True)
lcd.clear()
lcd.message("Backlight ON")
Example 6 - Temperature or Sensor Display Layout
This kind of layout is useful when you start showing live data from a sensor.
from machine import Pin, I2C
from nerdcave_lcd import LCD
import time

i2c = I2C(0, sda=Pin(0), scl=Pin(1), freq=400000)
lcd = LCD(i2c, cols=20, rows=4)

temperature = 24.6
humidity = 58.2

lcd.write(0, 0, "Weather Station")
lcd.write(0, 1, "Temp: {:.1f} C".format(temperature))
lcd.write(0, 2, "Humidity: {:.1f}%".format(humidity))
lcd.write(0, 3, "Status: OK")
Example 7 - Custom Characters
The LCD has 8 custom character slots (0-7). You define a 5x8 pixel pattern for a slot once, then print it anywhere in your text using chr(location), just like any other character.
from machine import Pin, I2C
from nerdcave_lcd import LCD

i2c = I2C(0, sda=Pin(0), scl=Pin(1), freq=400000)
lcd = LCD(i2c, cols=16, rows=2)

def create_char(lcd, location, charmap):
    """Load a 5x8 custom character into CGRAM slot 0-7"""
    location &= 0x7
    lcd.send_command(0x40 | (location << 3))
    for row in charmap:
        lcd.send_data(row)

HEART = bytearray([
    0b00000,
    0b01010,
    0b11111,
    0b11111,
    0b11111,
    0b01110,
    0b00100,
    0b00000,
])

create_char(lcd, 0, HEART)
lcd.message("I " + chr(0) + " Pico")
Drawing the pixel pattern by hand is tedious — use the Custom Character Designer below to draw it visually and copy the generated code instead.
Example 8 - Simple Clock
The Pico's onboard RTC keeps time while it's powered, no Wi-Fi required. Set it once at boot, then read it back every loop.
from machine import Pin, I2C, RTC
import time
from nerdcave_lcd import LCD

i2c = I2C(0, sda=Pin(0), scl=Pin(1), freq=400000)
lcd = LCD(i2c, cols=16, rows=2)

rtc = RTC()
rtc.datetime((2026, 1, 1, 0, 12, 0, 0, 0))  # (year, month, day, weekday, hour, minute, second, subsecond)

lcd.write(0, 0, "Clock Demo")

last_time = None
while True:
    _, _, _, _, hour, minute, second, _ = rtc.datetime()
    current = "{:02d}:{:02d}:{:02d}".format(hour, minute, second)
    if current != last_time:
        lcd.write(0, 1, current)
        last_time = current
    time.sleep(0.2)
On a Pico W, you can sync rtc.datetime() from NTP over Wi-Fi at boot so the clock is accurate without setting it by hand — see the Synchronize RTC over Wi-Fi tutorial.
Example 9 - Scrolling Marquee Text
For a message longer than the display, slide a window across the text instead of trying to cram it all in at once.
from machine import Pin, I2C
import time
from nerdcave_lcd import LCD

i2c = I2C(0, sda=Pin(0), scl=Pin(1), freq=400000)
lcd = LCD(i2c, cols=16, rows=2)

def scroll_text(lcd, row, text, cols, speed=0.3, pause=1.0):
    padded = " " * cols + text + " " * cols
    for start in range(len(padded) - cols + 1):
        lcd.write(0, row, padded[start:start + cols])
        time.sleep(speed)
    time.sleep(pause)

message = "Subscribe to NerdCave for more Raspberry Pi Pico projects!"

while True:
    scroll_text(lcd, 0, message, lcd.cols)
Custom Character Designer
Design 5×8 pixel custom characters for your LCD display (hearts, arrows, symbols, etc.) and instantly generate the MicroPython code. Choose between LCD1602 (16×2) or LCD2004 (20×4), design characters in the pixel grid, and preview them on your display layout.
🔤📺 LCD Character & Text Designer
Design 5x8 pixel custom characters, then type a trigger like <3 anywhere in your text to drop them in inline
Type <3 anywhere in a row below and it'll show as this character. Only slots with both a trigger and a drawn pixel are active.
1 custom character used
from machine import I2C, Pin
from nerdcave_lcd import LCD
import time

# Configure I2C
i2c = I2C(0, sda=Pin(0), scl=Pin(1), freq=400000)
lcd = LCD(i2c, cols=16, rows=2)

def create_char(lcd, location, charmap):
    """Load a 5x8 custom character into CGRAM slot 0-7"""
    location &= 0x7
    lcd.send_command(0x40 | (location << 3))
    for row in charmap:
        lcd.send_data(row)

CHAR_0 = bytearray([
    0b00000,
    0b01010,
    0b11111,
    0b11111,
    0b11111,
    0b01110,
    0b00100,
    0b00000,
])
create_char(lcd, 0, CHAR_0)

# Display text
frames = [
    # Frame 1
    ["                ", "                "]
]

for row, line in enumerate(frames[0]):
    lcd.write(0, row, line)
Code Explanation
1. Create the I2C bus
i2c = I2C(0, sda=Pin(0), scl=Pin(1), freq=400000)
This initializes I2C bus 0 using GP0 for SDA and GP1 for SCL.
2. Create the LCD object
lcd = LCD(i2c, cols=16, rows=2)
For LCD1602, use:
lcd = LCD(i2c, cols=16, rows=2)
For LCD2004, use:
lcd = LCD(i2c, cols=20, rows=4)
3. Display multi-line text
lcd.message("Hello\nWorld")
The \n moves to the next row.
4. Display positioned text
lcd.write(0, 1, "Bottom row")
This writes text starting at column 0, row 1.
5. Clear the screen
lcd.clear()
This removes the current contents and returns the display to a blank screen.
Common Problems
Nothing shows on the display
- check power and ground
- check that
SDAandSCLare wired correctly - adjust the contrast potentiometer on the I2C backpack
- run an I2C scan to confirm the device address
Wrong address
If the display is not found automatically, pass the address manually:
lcd = LCD(i2c, addr=0x27, cols=16, rows=2)
or
lcd = LCD(i2c, addr=0x3F, cols=20, rows=4)
Text wraps strangely on LCD2004
This usually happens when the row/column size is wrong. Make sure you are using:
lcd = LCD(i2c, cols=20, rows=4)
Backlight is on but no text appears
- contrast may be set incorrectly
- address may be wrong
- the display may be powered, but I2C communication is failing
Suggested Images to Add Later
Good images for this page would be:
- LCD1602 breadboard photo
- LCD2004 breadboard photo
- screenshot/photo of hello world output
- screenshot/photo of a 4-line LCD2004 demo
Summary
In this tutorial, you used one MicroPython library to control both LCD1602 and LCD2004 I2C character displays with the Raspberry Pi Pico. The main thing that changes between the two modules is the display size:
LCD1602 -> cols=16, rows=2LCD2004 -> cols=20, rows=4
With this setup, you can build menus, counters, status panels, and clean text interfaces for all kinds of Raspberry Pi Pico projects.